Malware Analysis Sandbox - CAPEv2 Setup and Installation
Important resources to follow along with:
Setting up CAPEv2 involves installing and configuring a malware analysis sandbox on a Linux system, typically Ubuntu. CAPEv2 is an advanced fork of the Cuckoo Sandbox, designed for malware configuration and payload extraction. Below is a step-by-step guide to get you started, based on the official documentation and community discussions.
Note: The Proxmox hypervisor uses nested virtualization, CAPEv2 running on an Ubuntu VM will work with nested virt enabled, but for serious use, install CAPEv2 on a dedicated Ubuntu box. For testing or a homelab, this is fine for our purposes. We also have to make sure Proxmox itself then is secure (just in case malware escapes the VM).
Prerequisites#
- OS: Ubuntu 24.04 LTS is recommended
- We use Windows 10 21H2 as our target OS
- Virtualization: Your CPU needs virtualization support (Intel VT-x or AMD-V).
- Network: A stable internet connection and a virtual network interface (e.g. vmbrx)
- Guest OS: A Windows VM (e.g., Win 10) for analysis
- Resource Requirements: 16GB+ RAM, 4+ CPU cores, and 200GB+ storage (SSDs preferred). More is better if you’re running multiple VMs.
Considerations#
SCSI Controller#
- Performance: Disk I/O speed for the Windows VMs, malware might do heavy read/write operations. We may need to account for unoptimized disk controllers, and SSD vs HDD.
- Compatibility: The controller must work seamlessly with both the Ubuntu VM (host for CAPEv2) and the Windows guests CAPEv2 manages.
- Detection Risk: Malware might detect certain controllers as signs of a virtualized environment, potentially altering its behavior.
- Nested Virt Stability: Since we are running CAPEv2 in a Proxmox VM, the controller needs to play nice with nested KVM.
So which one to pick…?
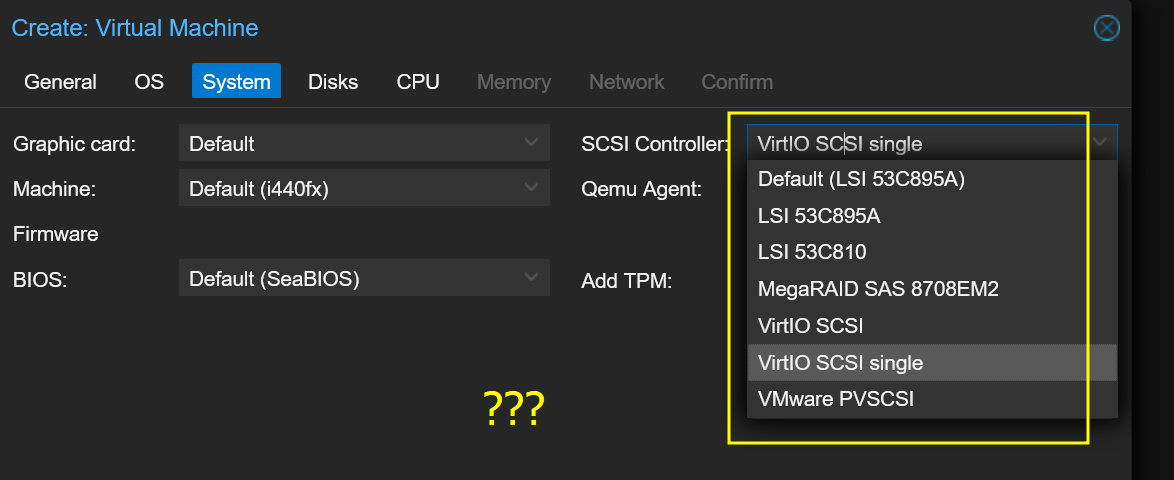
After some research we find some pros/cons to each controller type:
LSI 53C895A / LSI 53C810#
Emulated SCSI controllers based on the LSI Logic hardware. The 53C895A is a later model than the 53C810, with better performance and wider compatibility.
Pros
- Widely supported by Windows (one of CAPEv2’s guest OS) without extra drivers.
- Less likely to be flagged by malware as a virtualization artifact (emulates real hardware).
- Stable in nested setups—Proxmox and KVM handle LSI emulation well.
Cons
- Slower than VirtIO because it’s emulated, not paravirtualized. Disk I/O might bottleneck under heavy malware activity.
LSI 53C895A is a decent choice if you prioritize stealth (malware evasion) over performance.
MegaRAID SAS 8708EM2#
An emulated controller, mimicking an SAS hardware RAID controller.
Pros
- Also emulates real hardware, so less likely to be detected by malware than virtio scsi.
- Slightly better performance than LSI 53C895A in some cases due to RAID emulation.
Cons:
- Not as fast as VirtIO.
- Less common in consumer setups—some malware might flag it as unusual.
- Driver support in older Windows versions (e.g., Win 7) can be spotty.
- Similar to LSI but less common. Not a top pick unless you’ve got a specific reason.
VirtIO SCSI / VirtIO SCSI Single#
VirtIO is a paravirtualized driver for KVM/QEMU
Pros
- Best performance—paravirtualized, so it bypasses emulation overhead. Great for disk I/O-heavy malware.
- Native to KVM, so it’s stable in your nested setup (Proxmox > Ubuntu > CAPEv2).
Cons
- Requires VirtIO drivers in the Windows guest from Fedora.
- Malware might detect VirtIO as a virtualization marker, potentially altering behavior (though CAPEv2 has anti-anti-VM features to mitigate this).
Best for performance, especially in nested virt. Recommended if you’re okay with the driver install and potential detection risk.
VMware PVSCSI#
A paravirtualized SCSI controller for VMware environments.
Pros:
- High performance in VMware setups.
Cons:
- Not native to KVM/QEMU. Proxmox can emulate it, but it’s not optimized for our stack.
- Malware might detect it as a VMware artifact.
- Potential stability issues in nested KVM.
Should you use it?
CAPEv2 uses KVM, not VMware. Avoid this.
Final Verdict#
Recommendation for performance: VirtIO SCSI Single
Why?
CAPEv2 benefits from performance, and VirtIO SCSI single offers the best disk I/O in a nested KVM setup like yours. It’s optimized for single-disk VMs (typical for CAPEv2’s Windows guests), and since CAPEv2 already uses KVM, VirtIO is the native choice. The “single” variant reduces overhead compared to regular VirtIO SCSI, which supports multiple devices you likely won’t need.
Tradeoff: Malware might detect VirtIO, but CAPEv2 has anti-detection features (e.g., in processing.conf) to mask virtualization.
Recommendation for stealth: LSI 53C895A
Why?
Why LSI 53C895A Might Enhance Stealth:
The LSI 53C895A mimics a physical SCSI controller commonly found in older server-grade hardware, as opposed to modern paravirtualized controllers like VirtIO SCSI. Malware often checks for virtualization-specific indicators, such as VirtIO drivers or devices, which are strongly associated with QEMU/KVM environments like Proxmox. The LSI 53C895A, being an emulated “real” device, may not immediately trigger these detection mechanisms, making the VM appear more like a physical machine.
VirtIO controllers are paravirtualized, meaning they require specific drivers in the guest OS and are optimized for performance in virtual environments. These drivers and their associated device signatures (e.g., “Red Hat VirtIO SCSI” in lspci) are well-known virtualization markers that malware can detect via system enumeration. The LSI 53C895A, however, doesn’t rely on paravirtualization and presents itself as a generic SCSI controller, potentially reducing the VM’s detectable virtualization footprint.
CAPEv2 often involves running Windows-based victim VMs where malware executes. However, the host (Ubuntu on Proxmox) and its configuration still influence the sandbox environment. If the Ubuntu host uses the LSI 53C895A for its own disks, it aligns with a stealthier setup by avoiding VirtIO-related artifacts that might leak into nested VM configurations or logs, which malware could theoretically access.
Tradeoff: You may sacrifice some or a lot disk I/O speed.
Setup Steps#
In Proxmox
- Load the Ubuntu 22.04 ISO
- Set RAM:
set the Ubuntu VM’s disk to use “VirtIO SCSI single” (as shown in your screenshot).
For CAPEv2’s Windows VMs, also use VirtIO SCSI: In virt-manager (on the Ubuntu VM), create the Windows VM with VirtIO SCSI as the disk controller.
Install VirtIO drivers in Windows: Download from https://fedorapeople.org/groups/virt/virtio-win/, mount the ISO in the VM, and install the SCSI driver.
Update CAPEv2’s cuckoo.conf to reflect the VM setup.
If you’re worried about malware detection and don’t mind slower performance, switch to LSI 53C895A. It’s less likely to be flagged, and Windows supports it natively—no extra drivers needed. But in a nested setup, the performance hit might be noticeable, especially with I/O-heavy malware.
Initial Setup#
Proxmox uses KVM (or LXC) to run your Ubuntu 22.04 VM. CAPEv2, inside that VM, also uses KVM to spin up its analysis VMs (e.g., Windows guests). This is nested virtualization: Proxmox’s KVM hosts Ubuntu, and Ubuntu’s KVM hosts CAPEv2’s guests.
CAPEv2 can run if Proxmox and the Ubuntu VM are configured correctly. Proxmox supports nested virtualization out of the box, but it needs to be enabled:
- Check Host CPU Support
On your Proxmox host, confirm nested virt is possible:
For Intel
cat /sys/module/kvm_intel/parameters/nested
For AMD
cat /sys/module/kvm_amd/parameters/nested
Should return Y or 1.
If N or 0, enable it in BIOS (VT-x/AMD-V) or load the module:
echo "options kvm-intel nested=1" | sudo tee /etc/modprobe.d/kvm-intel.conf
sudo modprobe -r kvm_intel && sudo modprobe kvm_intel
- Enable Nested Virtualization in Proxmox VM
Your VM ID will be to the left sidebar of your Proxmox dashboard:
Edit your Ubuntu VM’s config in Proxmox
(e.g., /etc/pve/qemu-server/VMID.conf) and add:
cpu: host
Or via GUI: VM > Hardware > Processor > Type > host.
This passes virtualization extensions to the VM.
Verify in Ubuntu VM: Inside the VM, check:
egrep -c '(vmx|svm)' /proc/cpuinfo
If > 0, nested KVM is ready.
Proxmox Networking and Considerations#
- Use Proxmox firewall on the machine to block access to your local network and allow access only to Internet.
- RDP is NOT safe because it needs a connection to your home network. DO NOT DO
THIS for experimenting with malware.
- Use the noVNC console in your Proxmox browser window instead.
- Transfer all the files you need to have on the guest before downloading and experimenting with malware.
virt-manager (OPTIONAL)#
If you picked LSI 53C895A instead of VirtIO Single. The installation steps are identical except for the Windows VM setup in virt-manager—select SCSI with LSI 53C895A instead of VirtIO.
Installing Ubuntu#
I used 250 GB of space, 8 GB of RAM, and 4 CPUs for processing. This is what is enough for me, more is better in this case, especially since we are running on an already overloaded hypervisor.
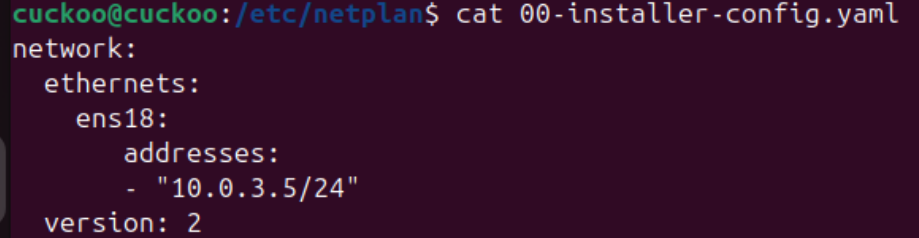
Ubuntu 24 Networking Issues#
I faced some issues post-installation when setting up networking. I could not ping to the Internet to receive updates and my router could not ping my Cuckoo box (10.0.3.5).
Here were the steps I took to fix this (steps may vary for you):
- Make sure atleast two of these files exist

- Contents of 00-installer-config.yaml
- Contents of 01-network-manager-all.yaml

- Contents of UUID-NET-INT-all.yaml
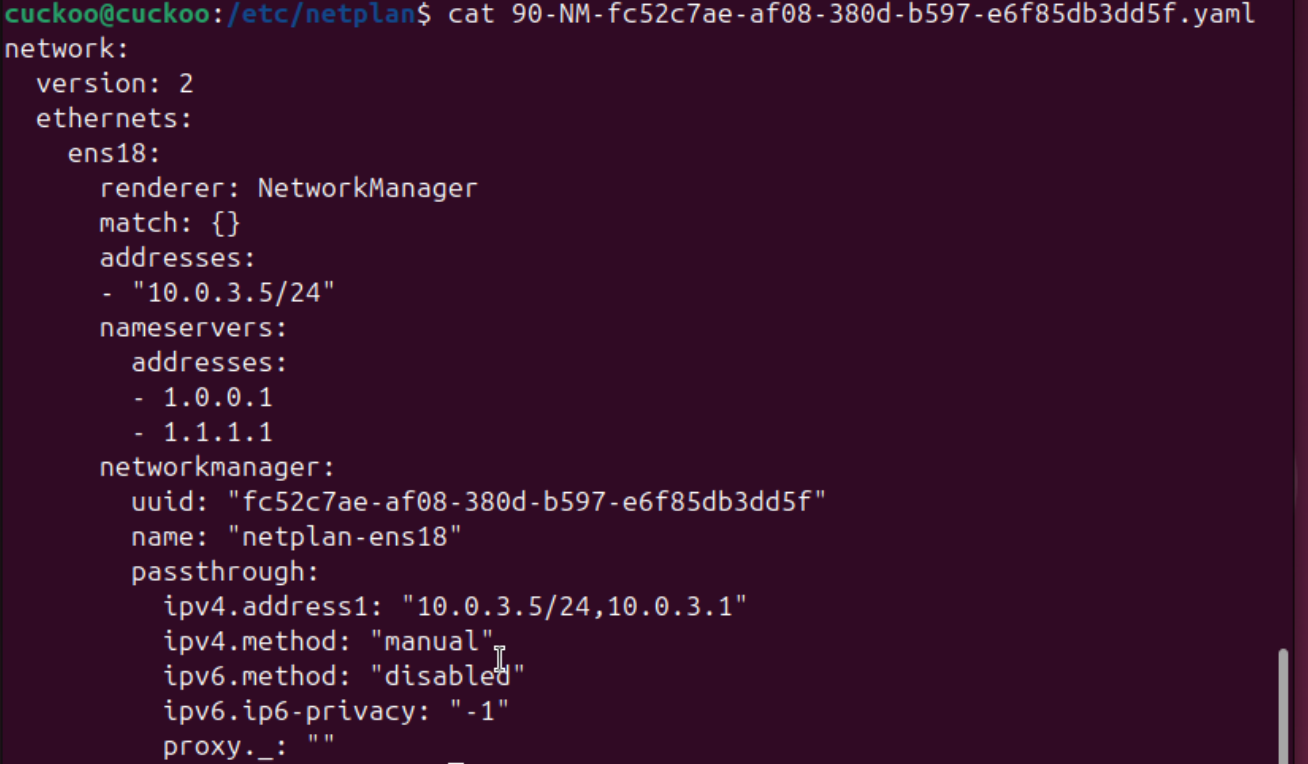
- If this file doesn’t exist, you will need to create it by finding your ethernet interfaces'
UUID.
- Use
nmcli connection show
- Use
- If this file doesn’t exist, you will need to create it by finding your ethernet interfaces'
UUID.
sudo netplan generatesudo netplan applyreboot
Installing CAPEv2#
Once Ubuntu has been installed, we need to install CAPEv2 following the steps from the official repository here: https://github.com/kevoreilly/CAPEv2?tab=readme-ov-file#installation-recommendations-and-scripts-for-optimal-performance
Download the script here and follow the steps in this guide.
We want to install KVM on top of our Ubuntu guest so that we can run the kvm-qemu.sh script, which performs a stealthier configuration and achieves better performance than the installation from APT.
Dumping the ACPI tables, extracting the OEM ID and using that ID to replace the instances of in the script is important if you want reduce the chances of malware detecting your sandbox.
sudo apt-get install acpica-toolsacpidump > acpidump.outiasl -d dsdt.datiasl -tc dsdt.dslgrep "OEM_ID" dsdt.dsl
Keep following the steps in the guide…
At the end make sure you do this!!!
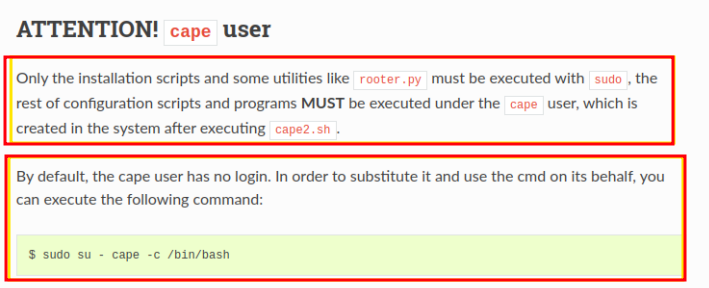
Configuring Cape#
The CapeV2 configuration files for me exist at /opt/CAPEv2/conf
Follow the steps here: https://capev2.readthedocs.io/en/latest/installation/host/configuration.html
Analyzing Malware traffic on the SIEM#
- Cuckoo Host (Ubuntu): 10.0.3.5/24
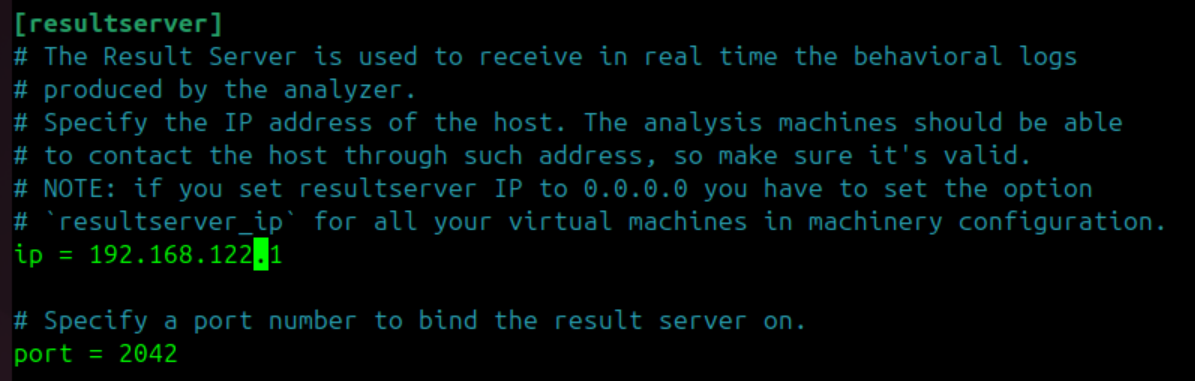
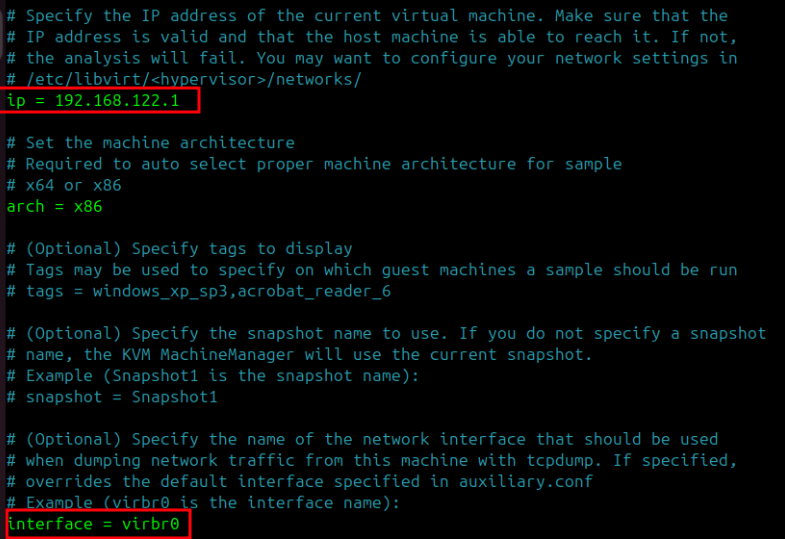
- KVM Virtual Network (virbr0): 192.168.122.1/24
- pfSense LAN Gateway: 10.0.3.1
- SIEM Network: 10.0.2.0/24
/opt/CAPEv2/conf/cuckoo.conf
Add the TEE Rule (Traffic Duplication)#
The TEE rule clones the packets and forwards the copy to a next-hop gateway. Since 10.0.2.5 (Security Onion) is not a direct neighbor, the next hop for that subnet is our pfSense router (10.0.3.1).
Run this on our cuckoo Ubuntu VM:
Your virtual ethernet interface will be named differently.
sudo iptables -t mangle -A POSTROUTING -s 192.168.122.0/24 -o ens18 -j TEE --gateway 10.0.3.1sudo netfilter-persistent save
Optional: we can add a static route to make sure our packets get to the pfSense Malware analysis gateway.
sudo ip route add 10.0.2.0/24 via 10.0.3.1 dev ens18
This traffic is one-way (Cuckoo -> SIEM) (to maintain network isolation from malware).
Modifying the cuckoo.conf#
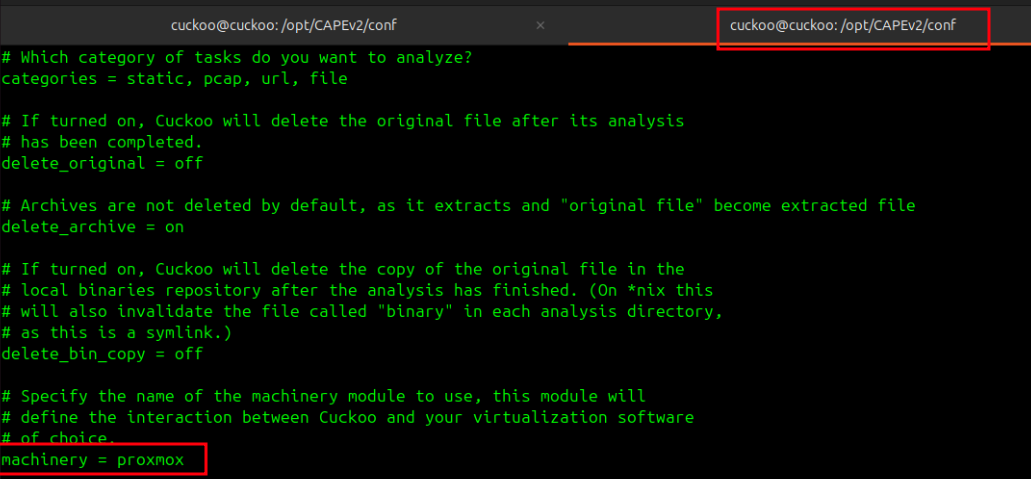
machinery under [cuckoo] We are using Proxmox which will be interacting with Cape’s KVM machines, so this value needs to be changed from the default KVM.
freespace under [cuckoo] by default is 50000 MB which is 50GB, we want to increase this to a higher amount, pick what works best for you.
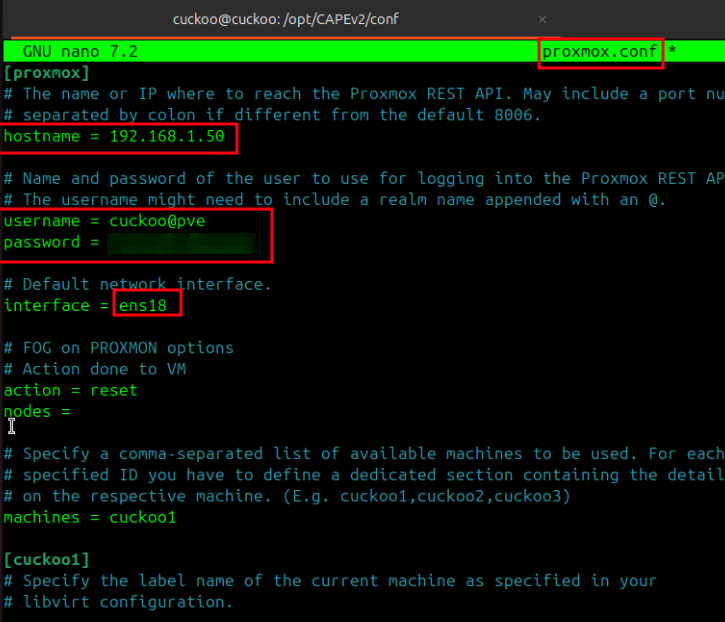
proxmox.conf#
Honorable mention#
https://4d5a.re/proxmox-cuckoo-a-powerful-combo-for-your-home-malware-lab/
Optional Enable Cuckoo Web Interface#
nano /conf/reporting.conf

Creating Guest VMs#
https://capev2.readthedocs.io/en/latest/installation/guest/requirements.html
We will cover this in Part 6.
See you then.
Back to Full Series.